


Removing spray foam correctly the first time matters because aggressive cutting or using the wrong method can damage nearby surfaces and lead to more repair work. The safest approach depends on the size of the job, the type of surface underneath, and how easy the area is to access.
This guide walks through the main factors that affect spray foam removal, what to expect for different job sizes and surfaces, and when DIY removal is realistic versus when professional help is the better choice.
Key Highlights
- Spray foam insulation is easiest to remove before it cures, while hardened foam usually needs to be trimmed, scraped, or carefully cut away.
- The safest removal method depends on the surface, the size of the buildup, and how easy the area is to access.
- Small cured spots can often be handled by hand, but larger attic, roof deck, or deep-gap removal usually requires more care and cleanup.
- Some projects only need excess foam trimmed back, while others require partial or full removal to prepare the area for repairs or finishing work.
- Professional removal is usually the better fit for larger or more delicate spray foam removal jobs.
What Affects Spray Foam Removal
Several factors affect the safest way to remove spray foam:
- Foam condition: Fresh foam is usually easier to remove, while cured foam often needs trimming, scraping, or light sanding.
- Surface type: Glass, metal, wood, masonry, and painted finishes all respond differently and can be damaged if removed using the wrong method.
- Size and location: A small smear on an open surface is much easier to remove than hardened foam packed into deep gaps, overhead areas, or corners.
- Nearby materials: Removal should be more delicate when the foam is close to trim, wiring, pipes, or finished materials that could be scratched, gouged, or otherwise damaged during cleanup.
- Final finish required: In some cases, you only need to trim back excess foam to make the area usable. In others, the surface needs a cleaner finish so it can be patched, painted, or refinished afterward.
In Chicago’s Climate Zone 5A, spray polyurethane foam removal in a rim joist or an attic should be planned carefully to avoid moisture or insulation problems. If the area will be rebuilt, you can also check IRC Section R316 and any requirements from the City of Chicago Department of Buildings or your local inspector.
Once you understand these factors, the next step is to match the job size to the safest removal method.
Spray Foam Removal by Job Size
The size of the job affects how much time, cleanup, and caution the removal process will require. The table below compares spray foam removal by job size, including the usual method, tools, and risk level:
Table caption: Spray foam removal by project size.
Use this table to match the size of your removal project with the method, tools, and level of caution it usually requires.
How Much Does Spray Foam Removal Cost?
Spray foam removal often costs more than removing other insulation materials because it usually takes more cutting, scraping, and cleanup, especially when the foam has hardened or is stuck to delicate surfaces.
The final cost usually depends on the difficulty of the removal rather than a simple flat rate. Access, surface sensitivity, the amount of cured buildup, and the level of cleanup required can all affect the amount of labor required for the job.
Green Attic lists insulation removal at $1.15 per square foot, fiberglass batt removal at $1.40 per square foot, and blown-in insulation removal at $5.50 per square foot. Spray foam removal is usually priced through a project-specific estimate instead of a standard rate.
How To Remove Hardened Spray Foam Efficiently?
Once spray foam has fully set, removal usually follows a simple sequence: trim the bulk, scrape the residue, and sand lightly only if needed for a smoother finish. In most cases, sanding should be the final touch rather than the main removal method.
If thin smears remain, a small amount of mineral oil may help loosen the residue. Mineral oil is not the same as mineral spirits, so make sure you use the right one.
How to Remove Cured Spray Foam by Hand
Hand removal works best for small areas, light overspray, and spots where you need more control than a power tool allows.
Follow these steps to remove cured spray foam by hand:
- Make sure the material is firm before you begin. Fully cured foam is the easiest to remove cleanly and predictably.
- Work in thin, controlled passes: Use a utility knife to shave down raised foam gradually. Keep the blade shallow, especially near wiring, trim, pipes, or finished surfaces.
- Lift the remaining buildup carefully: Use a scraper or putty knife to remove what is left after trimming. Start with the gentlest tool possible on delicate surfaces.
- Use a brush where scraping is less effective: For textured masonry, corners, or uneven wood grain, a stiff-bristle brush can help loosen small leftover pieces.
- Test any cleaner before using it on residue: On painted or finished surfaces, try it first in a hidden spot. Solvents that help uncured foam are usually ineffective on fully cured material.
- Clean the area before finishing: Remove dust and debris with a brush, dustpan, or vacuum so the surface is easier to inspect, patch, or paint.
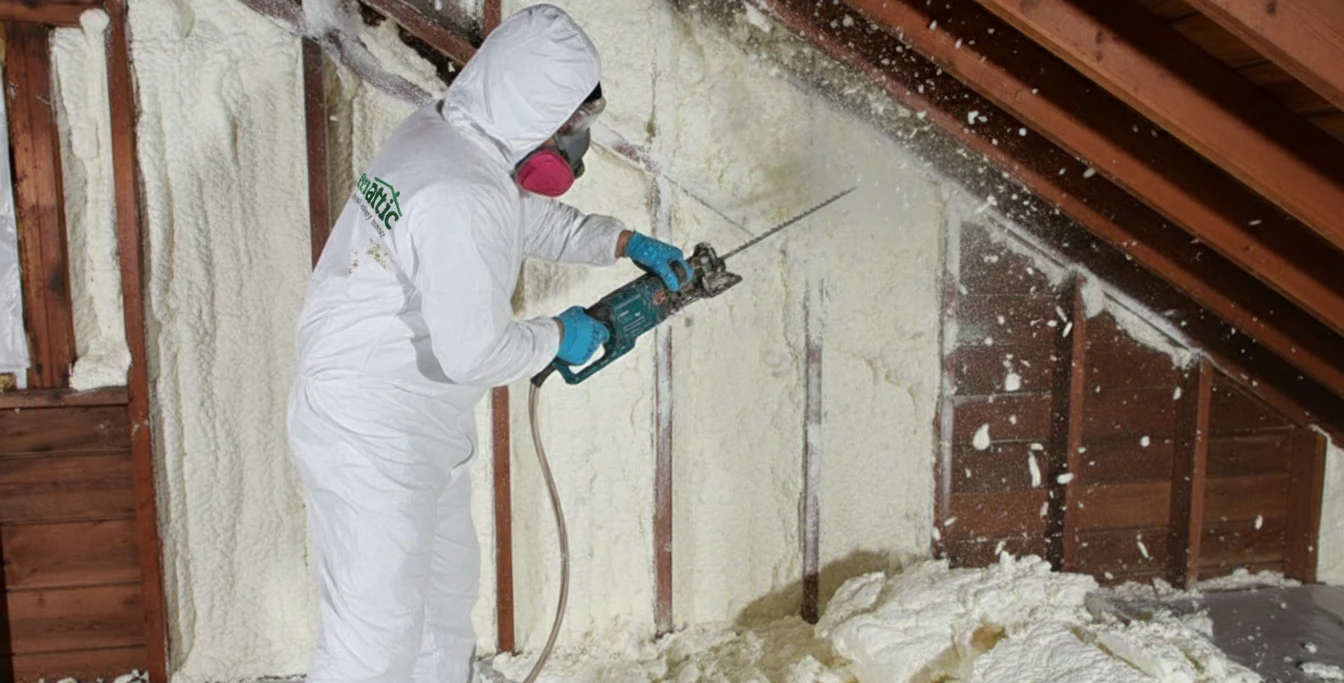
Machine-Assisted Removal for Larger Jobs
Machine-assisted removal works best when cured foam covers a larger area and hand tools alone would be too slow or inconsistent.
Follow these steps when using power tools to remove spray foam:
- Choose a tool that gives you control: A serrated blade, an oscillating multi-tool, or a similar cutting tool usually works best for removing larger sections without tearing into nearby materials.
- Remove foam in shallow passes: Avoid forcing deep cuts. Instead, do gradual passes that are easier to control to reduce the chance of damaging framing, trim, or finished surfaces underneath.
- Manage dust as you work: Power tools can generate a lot of dust, so stop periodically to vacuum up debris and keep the area visible.
- Inspect the surface as the buildup comes down: Check around edges, corners, and transitions often so you do not remove more than necessary.
- Finish only where needed: After the main buildup is gone, use a scraper or light smoothing tool only on areas that still need cleanup.
Common Spray Foam Removal Tips
Spray foam removal usually works best when you treat it as a careful process, not a quick cleanup. Start with shallow cuts and remove the spray foam in thin layers so you have better control and a cleaner result. Slow, steady passes are less likely to damage the surface underneath.
For better results:
- Use shallow passes instead of force.
- Match the removal method to the surface underneath.
- Remove cured foam in stages, then use light scraping or sanding only if needed.
- Set up dust control early.
- Leave enough time for cleanup on larger areas.
Larger jobs usually go better when cleanup is planned from the start. Foam dust and debris build up quickly, especially when power tools are involved, which can make it harder to see what you are doing. Good removal usually comes down to control, patience, and knowing when to stop before you damage the surface.
In older Chicagoland homes, foam removal near painted trim may need to follow the EPA RRP Rule if lead paint could be present. Safer work may also involve proper PPE, P100 respirators, and HEPA dust control, especially when dust containment matters.
Spray Foam Removal by Surface Type
Different surfaces tolerate removal differently, so the goal is to clear the foam without creating extra repair work.
Wood
Wood can usually handle trimming and scraping, but deep cuts can leave gouges that are difficult to repair. A shallow blade angle and slow passes are usually safer to use than forcing the tool under the foam.
Brick or Masonry
Spray foam often grips textured, porous masonry, so the cleanest results come from a gradual approach. Start with brushing to loosen material from surface pores, then scrape in controlled passes rather than prying aggressively.
Metal
Painted or coated metal benefits from a gentle, controlled approach to keep the finish looking its best. Start by trimming away the bulk of the foam first, then use light, controlled passes to lift what remains without risking the finish.
Glass
Glass requires gentle removal because slips can leave visible scratches. Controlled trimming and careful residue removal are usually safer than applying force at a steep angle.
Painted or Finished Surfaces
Painted and finished surfaces are often the easiest to damage during removal. Testing tools and any cleaning product in an inconspicuous area first can help reduce the risk of lifting paint or marring the finish.
Should You Trim, Remove, or Leave Spray Foam Alone?
The right approach to spray foam removal depends on what the foam is doing in the space. This table shows when trimming, partial removal, or full removal makes sense and the main risk tied to each option:
Table caption: Trim, partial removal, and full removal at a glance.
When the scope is unclear or the area is delicate, you should stop and assess the situation before removing more than necessary.
DIY vs Professional Spray Foam Removal
DIY spray foam removal can work for minor cleanup in open, easy-to-reach areas. Once the foam is widespread, buried in joints, or close to finished materials and utilities, professional insulation removal is usually the safer choice.
DIY spray foam removal may be a good option when:
- The foam is limited to a small area.
- The surface is easy to access.
- The risk of damaging nearby materials is minimal.
- Hand tools are enough to remove the foam safely.
- The job only requires light cleanup or trimming.
Professional spray foam removal makes more sense when:
- The foam covers a large area.
- The foam has fully cured and bonded deep into joints or gaps, which makes careful, step-by-step removal the best approach.
- The work is near pipes, framing, electrical wiring, or finished surfaces.
- Sanding, grinding, or machine-assisted removal may be needed.
- You are not sure whether trimming is enough or full removal is necessary.
After spray foam removal, many homeowners add new insulation and air sealing as part of the next step.
In the Chicago area, that may also include checking ComEd, Peoples Gas, or North Shore Gas efficiency programs and keeping permits, debris disposal, and contract paperwork in order.
Frequently Asked Questions
Can spray foam insulation be easily removed?
No, spray foam insulation is difficult to remove once it has fully cured, which is why a careful, step-by-step approach works best.
Small areas may be manageable with careful trimming and scraping, but larger or more deeply bonded sections often take more time and control to remove without damaging the surface underneath. In many cases, professional removal is the safer option.
What dissolves cured spray foam insulation?
No common household chemical will reliably dissolve cured spray foam insulation once it has fully hardened. Acetone may help with uncured foam, but it does not work on cured foam. In most cases, cured spray foam must be removed by cutting, scraping, or grinding it away.
How long does it take to remove spray foam?
Green Attic does not give a standard timeline because spray foam removal is scope-driven.
Timing depends on how much foam was applied, how it was installed, how accessible the area is, and whether roof leaks or water damage mean the foam needs to be removed and replaced as part of the fix.
Is it worth removing spray foam insulation?
Yes, it can be worth removing spray foam insulation when it blocks repairs, makes inspection harder, or needs to be cleared from an area completely.
It can also be a smart choice when the foam was installed incorrectly or when addressing persistent odor concerns. In those cases, removal can make the area easier to inspect, repair, and finish properly.
Why is it hard to sell a house with spray foam insulation?
Spray foam insulation can make a house harder to sell if it limits roof visibility or makes the area harder to inspect. This often prompts buyers, inspectors, and lenders to request a clearer view of the roof structure before moving forward.
Why Trust Us
Green Attic Insulation, a family-owned and BPI-certified company, has served the Chicagoland area since 2009 with smart, sustainable insulation solutions that enhance energy efficiency in residential and commercial buildings.
With over 1,200 local projects completed, we help homeowners, builders, and developers meet and exceed IECC and local code requirements using residential, industrial or commercial spray foam insulation, cellulose and continuous insulation systems.

![What is a Soffit Vent? Your Complete Guide to Attic Ventilation [2026]](https://cdn.prod.website-files.com/64748b312a3cf2627374a8cb/652082391fbb9c5686d8c5d0_Install%20Soffit%20Vents%20And%20Improve%20Attic%20Ventilation.webp)
